앱 개발을 하면 각자 취향에 맞게 너무 다르다.
그래서 https://developer.android.com 사이트에 문서 항목에 디자인 가이드 라인이 있다.
여기서 앱을 어떻게 디자인 해야 사람들이 많이 앱에 머무르는지 나와있다.
◎Material Design : Gogle 디자인 가이드 라인
①Navigation Drawer
②Toolbar
③AppBar Layout, TabLayout
어떻게 구현할 건지 간략 설명
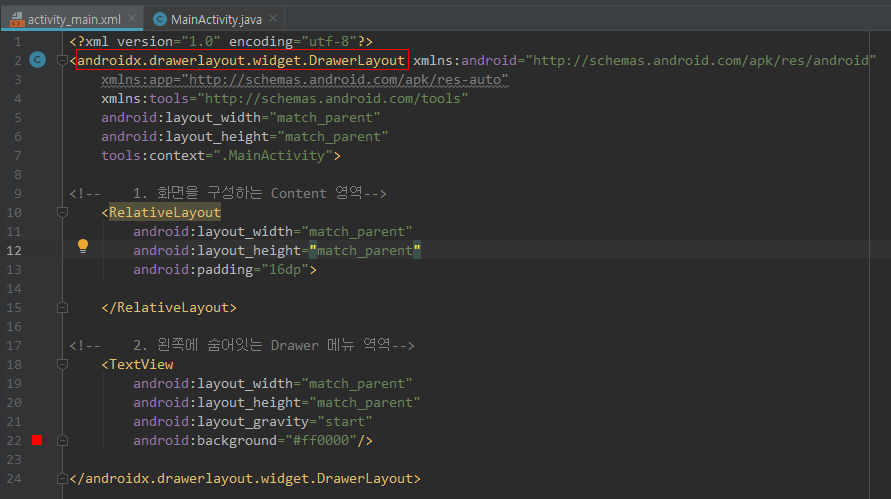
Drawerlayout은 딱 두개의 View만 넣을 수 있다.( Contents , side Menu)
그래서 화면에 꽉차는 Navigation Drawer를 하나 만들고,
그 안에 view 두 개를 구성(Reletive, TextView <- 나중에 NavigationView로 바꿀거임)

activity_main.xml 코드를 먼저 작성해보자.
Drawer에 두개의 View만 있을 수 있다. (옆으로 넘길 view를 꼭 두번째로 기재해야함. 순서!!)
<실행 화면>

java코드를 안써도 이렇게 sideView가 있는 것을 확인 할 수 있다.
이제 TextView를 NavigationView로 바꾸자. (TextView는 화면이 제대로 나오는지만 보려고..)
NavigationView를 쓰려면 Library를 추가해줘야한다.
(예전에는 design을 추가했지만, 계속적으로 바뀌고 있어서 https://developer.android.com 확인하고 그때마다 변경 사항이 있는지 알아야한다. 이게 개발자의 숙명....)
아래 사진처러 저 곳에 추가를 해야하지만 편리하게 추가하는 방법이 있다.


activit_main.xml 코드
|
1
2
3
4
5
6
7
8
9
10
11
12
13
14
15
16
17
18
19
20
21
22
23
24
25
|
<?xml version="1.0" encoding="utf-8"?>
<androidx.drawerlayout.widget.DrawerLayout xmlns:android="http://schemas.android.com/apk/res/android"
xmlns:app="http://schemas.android.com/apk/res-auto"
xmlns:tools="http://schemas.android.com/tools"
android:layout_width="match_parent"
android:layout_height="match_parent"
tools:context=".MainActivity">
<!-- 1. Content 영역-->
<RelativeLayout
android:layout_width="match_parent"
android:layout_height="match_parent"
android:padding="16dp">
</RelativeLayout>
<!-- 2. 왼쪽에 숨어 있는 Drawer 메뉴 영역-->
android:layout_width="match_parent"
android:layout_height="match_parent"
android:layout_gravity="start">
r
|
<실행 화면>

'안드로이드 웹앱 콘테츠 개발자 양성(국비지원) > Android 화면 구성 기능(디자인- xml 과 java로 제어)' 카테고리의 다른 글
| Android Studio Navigation Drawer + ToolBar (3) | 2019.09.27 |
|---|---|
| Android Studio ToolBar (0) | 2019.09.27 |
| Android Studio Navigation Drawer 1-2 (0) | 2019.09.27 |
| Android Studio Menu (Option Menu) (0) | 2019.09.16 |
| Android 사용자 알림( Toast, Dialog) (0) | 2019.09.11 |


댓글