안드로이드 스튜디오에서는 기본 폰트가 설정되어 있다. (폰트는 확장자가 두개 : .ttf , .otf )
폰트도 저작권이 있다. 그러니 무료를 이용하고, 상업용으로도 가능한 것을 권장한다.
[라이센스를 꼭 읽어라!!]

네이버 무료 폰트도 유명하고, 검색을 통해서 찾으면 됩니다. 유동적으로 하자!!
이제 앱을 만들자. 폰트를 해당 앱에 추가해야 한다. (res말고 asset 폴더를 만들어야 한다.)


assets에 폰트를 바로 추가해도 되지만, 관리를 하기 위해서는 하위 폴더를 만든다.


내 컴퓨터에 있는 폰트를 넣겠다.

복사한 폰트를 fonts 폴더에 복붙

아래 사진과 같이 fonts 폴더에 추가된 것을 확인할 수 있다.

글꼴은 자바로 적용해야한다.


그러나 이렇게는 너무 불편하다. 프리뷰로 안보여서 실행하고 볼 수 있다.
즉, 프로그래머가 만든 클래스 사용 [많이 사용됨 TextView를 상속 받은 클래스를 만듬!!!]
아래 방법을 많이 사용함


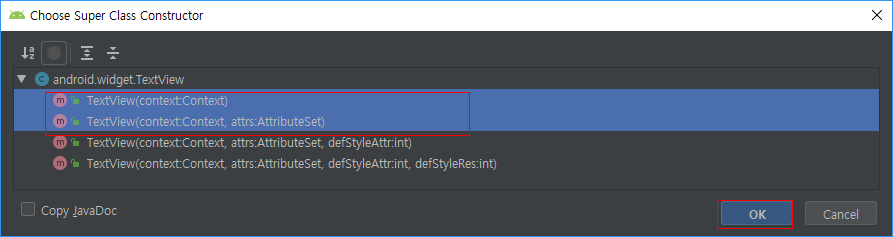
기본적으로 View는 생성자가 꼭 있어야 한다. (업그레이드 되면서 바뀜..)

생성자 두개를 만들자.
그리고 업데이트가 되면서 TextView를 상속했을 때, 에러가 나올것이다. AppCompt을 앞에 기재하고 import.


색 변경도 가능


보통 프리뷰에서 폰트를 미리 보기 때문에, 상속 받은 뷰를 많이 사용한다.
오늘은 간단히 Font에 대해서 알아보았다.
activity_main.xml
|
1
2
3
4
5
6
7
8
9
10
11
12
13
14
15
16
17
18
19
20
21
22
23
24
25
26
27
28
29
30
31
32
33
34
35
36
37
|
<?xml version="1.0" encoding="utf-8"?>
xmlns:app="http://schemas.android.com/apk/res-auto"
xmlns:tools="http://schemas.android.com/tools"
android:layout_width="match_parent"
android:layout_height="match_parent"
android:background="#dd5500"
tools:context=".MainActivity">
<TextView
android:id="@+id/tv"
android:layout_width="wrap_content"
android:layout_height="wrap_content"
android:text="Hello World"
android:textSize="40sp"
android:textColor="@color/colorPrimaryDark"
android:layout_centerInParent="true"/>
<!-- 폰트가 설정된 Custom TextView[프로그래머가 만든 클래스]-->
android:layout_width="wrap_content"
android:layout_height="wrap_content"
android:text="Hello Android"
android:layout_centerHorizontal="true"
android:layout_below="@+id/tv" />
android:layout_width="wrap_content"
android:layout_height="wrap_content"
android:text="폰트 적용 텍스트뷰"
android:layout_centerHorizontal="true"
android:layout_alignParentBottom="true"
android:layout_marginBottom="16dp"/>
</RelativeLayout>
|
MainActivity.java
|
1
2
3
4
5
6
7
8
9
10
11
12
13
14
15
16
17
18
19
20
21
22
23
24
25
26
27
28
29
30
|
package com.lcw.ex87fonttest;
import android.graphics.Typeface;
import android.os.Bundle;
import android.widget.TextView;
public class MainActivity extends AppCompatActivity {
TextView tv;
@Override
protected void onCreate(Bundle savedInstanceState) {
super.onCreate(savedInstanceState);
setContentView(R.layout.activity_main);
tv=findViewById(R.id.tv);
//폰트 설정
//Assets 폴더의 창고 관리자 객체 소환
AssetManager assetManager=getAssets();
//폰트 객체 생성
Typeface typeface= Typeface.createFromAsset(assetManager,"fonts/billabong.otf");
tv.setTypeface(typeface);
}
}
|
MyFontTextView.java
|
1
2
3
4
5
6
7
8
9
10
11
12
13
14
15
16
17
18
19
20
21
22
23
24
25
26
27
28
29
30
31
32
33
34
|
package com.lcw.ex87fonttest;
import android.content.Context;
import android.graphics.Color;
import android.graphics.Typeface;
import android.util.AttributeSet;
import androidx.annotation.Nullable;
public class MyFontTextView extends AppCompatTextView {
//생성자1 : 자바에서 new를 할때
public MyFontTextView(Context context) {
super(context);
//폰트설정을 생성자에서!!
Typeface typeface= Typeface.createFromAsset(context.getAssets(),"fonts/aaa.ttf");
setTypeface(typeface);
setTextSize(40);
setTextColor(Color.WHITE);
}
//생성자2 : XML로 만들 때
public MyFontTextView(Context context, @Nullable AttributeSet attrs) {
super(context, attrs);
Typeface typeface= Typeface.createFromAsset(context.getAssets(),"fonts/aaa.ttf");
setTypeface(typeface);
setTextSize(40);
setTextColor(Color.WHITE);
}
}
|
'안드로이드 웹앱 콘테츠 개발자 양성(국비지원)' 카테고리의 다른 글
| IT 국비교육의 실제 후기 및 가이드 라인 (3) | 2020.03.06 |
|---|
댓글